
Beauty Elevate
How to Make Glow in the Dark Cupcakes
Jun
Glow in the dark cupcakes sound like something a tiny wizard would sell at a school bake sale, but the good news is this: you do not need magic, mystery powder, or anything questionable from the craft drawer. You need a smart cupcake recipe, edible decorating ingredients, and one very important party tricksafe fluorescence under a black light.
The secret behind most edible glowing cupcake ideas is not that the cupcakes glow by themselves in a dark room like radioactive muffins from a cartoon. Instead, certain ingredients, especially tonic water containing quinine, can appear to glow blue when placed under ultraviolet light. Add bright neon-colored frosting, a clean black light setup, and a little kitchen confidence, and suddenly dessert becomes the star of the party. Your cupcakes are no longer “just cupcakes.” They are cupcakes with a lighting department.
This guide explains how to make glow in the dark cupcakes safely, how to get the best glowing effect, what ingredients to use, what to avoid, and how to troubleshoot cupcakes that look more “dim hallway” than “cosmic bakery.” Whether you are planning a Halloween party, birthday party, school event, sleepover, movie night, or a neon-themed dessert table, this recipe gives you a fun, edible, and realistic way to create cupcakes that shine under a black light.
What Makes Cupcakes Glow in the Dark?
Before we plug in the black light and start acting like dessert scientists, let’s clear up a common misunderstanding. Most homemade glow in the dark cupcakes do not glow in total darkness on their own. They glow or fluoresce when exposed to ultraviolet light, usually from a black light. That is why the setup matters almost as much as the recipe.
Tonic water is the classic ingredient because it contains quinine, a bitter compound that reacts to UV light by giving off a blue glow. This is the same reason a glass of tonic water can look like it belongs in a superhero laboratory when placed under a black light. In cupcake form, tonic water can be used in a glaze, gelatin-style coating, or light frosting accent to create a visible glow.
Neon food coloring can also make decorations look brighter under party lighting, though it may not “glow” as strongly as tonic water. For the best effect, use both: bright frosting colors for visual drama and a tonic-water glaze for the glowing finish. Think of it as giving your cupcakes both a costume and a spotlight.
Safety First: What Not to Use
This part matters. Glow in the dark cupcakes should be fun, not a questionable science fair incident. Only use ingredients labeled as edible and intended for food. Do not use glow sticks, glow powder, craft glitter, body paint, acrylic paint, highlighter ink, laundry products, or anything labeled for crafts, cosmetics, plastics, or decoration only. If it is not clearly food-safe, it does not belong near your cupcakes.
Also, use a regular party black light or UV-A black light designed for visual effects. Do not use UV-C sanitizing lamps or UV disinfecting wands around food, skin, or eyes. Black lights should be used sensibly: place them where they shine on the dessert table, not directly into people’s faces. The cupcakes are supposed to be dramatic. Your eyeballs are not auditioning.
For food safety, bake the cupcakes fully and avoid tasting raw batter. Raw flour and raw eggs can carry germs, even when the batter smells like vanilla happiness. Wash hands, bowls, counters, and utensils after handling batter. If using cream cheese frosting, whipped cream frosting, or any frosting with perishable dairy ingredients, keep cupcakes refrigerated until serving.
Ingredients for Glow in the Dark Cupcakes
For the Vanilla Cupcakes
- 1 1/2 cups all-purpose flour
- 1 1/2 teaspoons baking powder
- 1/4 teaspoon salt
- 1/2 cup unsalted butter, softened
- 3/4 cup granulated sugar
- 2 large eggs, room temperature
- 2 teaspoons vanilla extract
- 1/2 cup whole milk, room temperature
- 12 cupcake liners
For the Neon Buttercream Frosting
- 1 cup unsalted butter, softened
- 3 1/2 cups powdered sugar
- 2 to 3 tablespoons milk or heavy cream
- 1 teaspoon vanilla extract
- Pinch of salt
- Neon gel food coloring, such as green, blue, pink, yellow, or purple
For the Glow Glaze
- 1 cup tonic water
- 1 package unflavored gelatin or 2 teaspoons powdered gelatin
- 1 to 2 tablespoons sugar or light corn syrup
- Optional: a few drops of lemon or vanilla extract
Helpful Tools
- Muffin pan
- Mixing bowls
- Hand mixer or stand mixer
- Piping bag and star tip
- Small saucepan
- Pastry brush or spoon
- Food-safe neon sprinkles
- Party black light
Step-by-Step Recipe: How to Make Glow in the Dark Cupcakes
Step 1: Prepare the Baking Setup
Preheat your oven to 350°F. Line a standard 12-cup muffin pan with cupcake liners. For a stronger visual effect, choose white, black, silver, or neon liners. Black liners make bright frosting pop, while white liners reflect more light and help the cupcakes look cleaner under a black light.
Take the butter, eggs, and milk out ahead of time so they can come closer to room temperature. Room-temperature ingredients blend more smoothly, which helps create a soft, even cupcake crumb. Cold ingredients can make the batter look curdled or uneven. The cupcakes will still bake, but they may not have that fluffy bakery-style texture everyone secretly hopes for.
Step 2: Mix the Dry Ingredients
In a medium bowl, whisk together the flour, baking powder, and salt. This helps distribute the baking powder evenly so each cupcake rises like it received the same motivational speech.
Do not pack the flour into the measuring cup. Spoon it in lightly and level it off with a knife. Too much flour can make cupcakes dry, dense, and slightly sad. Measuring flour correctly is one of those small baking habits that makes a big difference.
Step 3: Cream the Butter and Sugar
In a large bowl, beat the softened butter and granulated sugar for 2 to 3 minutes, until pale and fluffy. This step creates tiny air pockets that help the cupcakes rise. If you rush it, the cupcakes may still taste good, but they may not have the light texture you want.
Add the eggs one at a time, beating well after each addition. Mix in the vanilla extract. Scrape down the sides of the bowl so everything blends evenly. Batter likes to hide on the sides of the bowl like it has unpaid rent.
Step 4: Combine Wet and Dry Ingredients
Add one-third of the flour mixture to the butter mixture and mix on low speed. Add half of the milk, then another third of the flour mixture, then the remaining milk, and finally the last of the flour mixture. Mix only until combined.
Overmixing cupcake batter can make the finished cupcakes tough because too much gluten develops once flour meets liquid. Stop mixing when the batter looks smooth and no dry streaks remain. This is not the moment to test your mixer’s horsepower.
Step 5: Fill and Bake
Divide the batter evenly among the cupcake liners, filling each about two-thirds full. A cookie scoop or 1/4-cup measuring cup works well for consistent portions. Bake for 16 to 20 minutes, or until the tops spring back lightly and a toothpick inserted into the center comes out clean.
Let the cupcakes cool in the pan for about 5 minutes, then transfer them to a wire rack. Cool completely before frosting. Warm cupcakes melt buttercream, and melted buttercream has the confidence of a puddle.
How to Make Neon Buttercream Frosting
Beat the softened butter for 2 minutes until creamy. Add powdered sugar one cup at a time, mixing on low speed at first so your kitchen does not turn into a powdered sugar weather event. Add the vanilla, salt, and 2 tablespoons of milk or cream. Beat for 2 to 3 minutes until fluffy. If the frosting is too thick, add a little more milk. If it is too thin, add more powdered sugar.
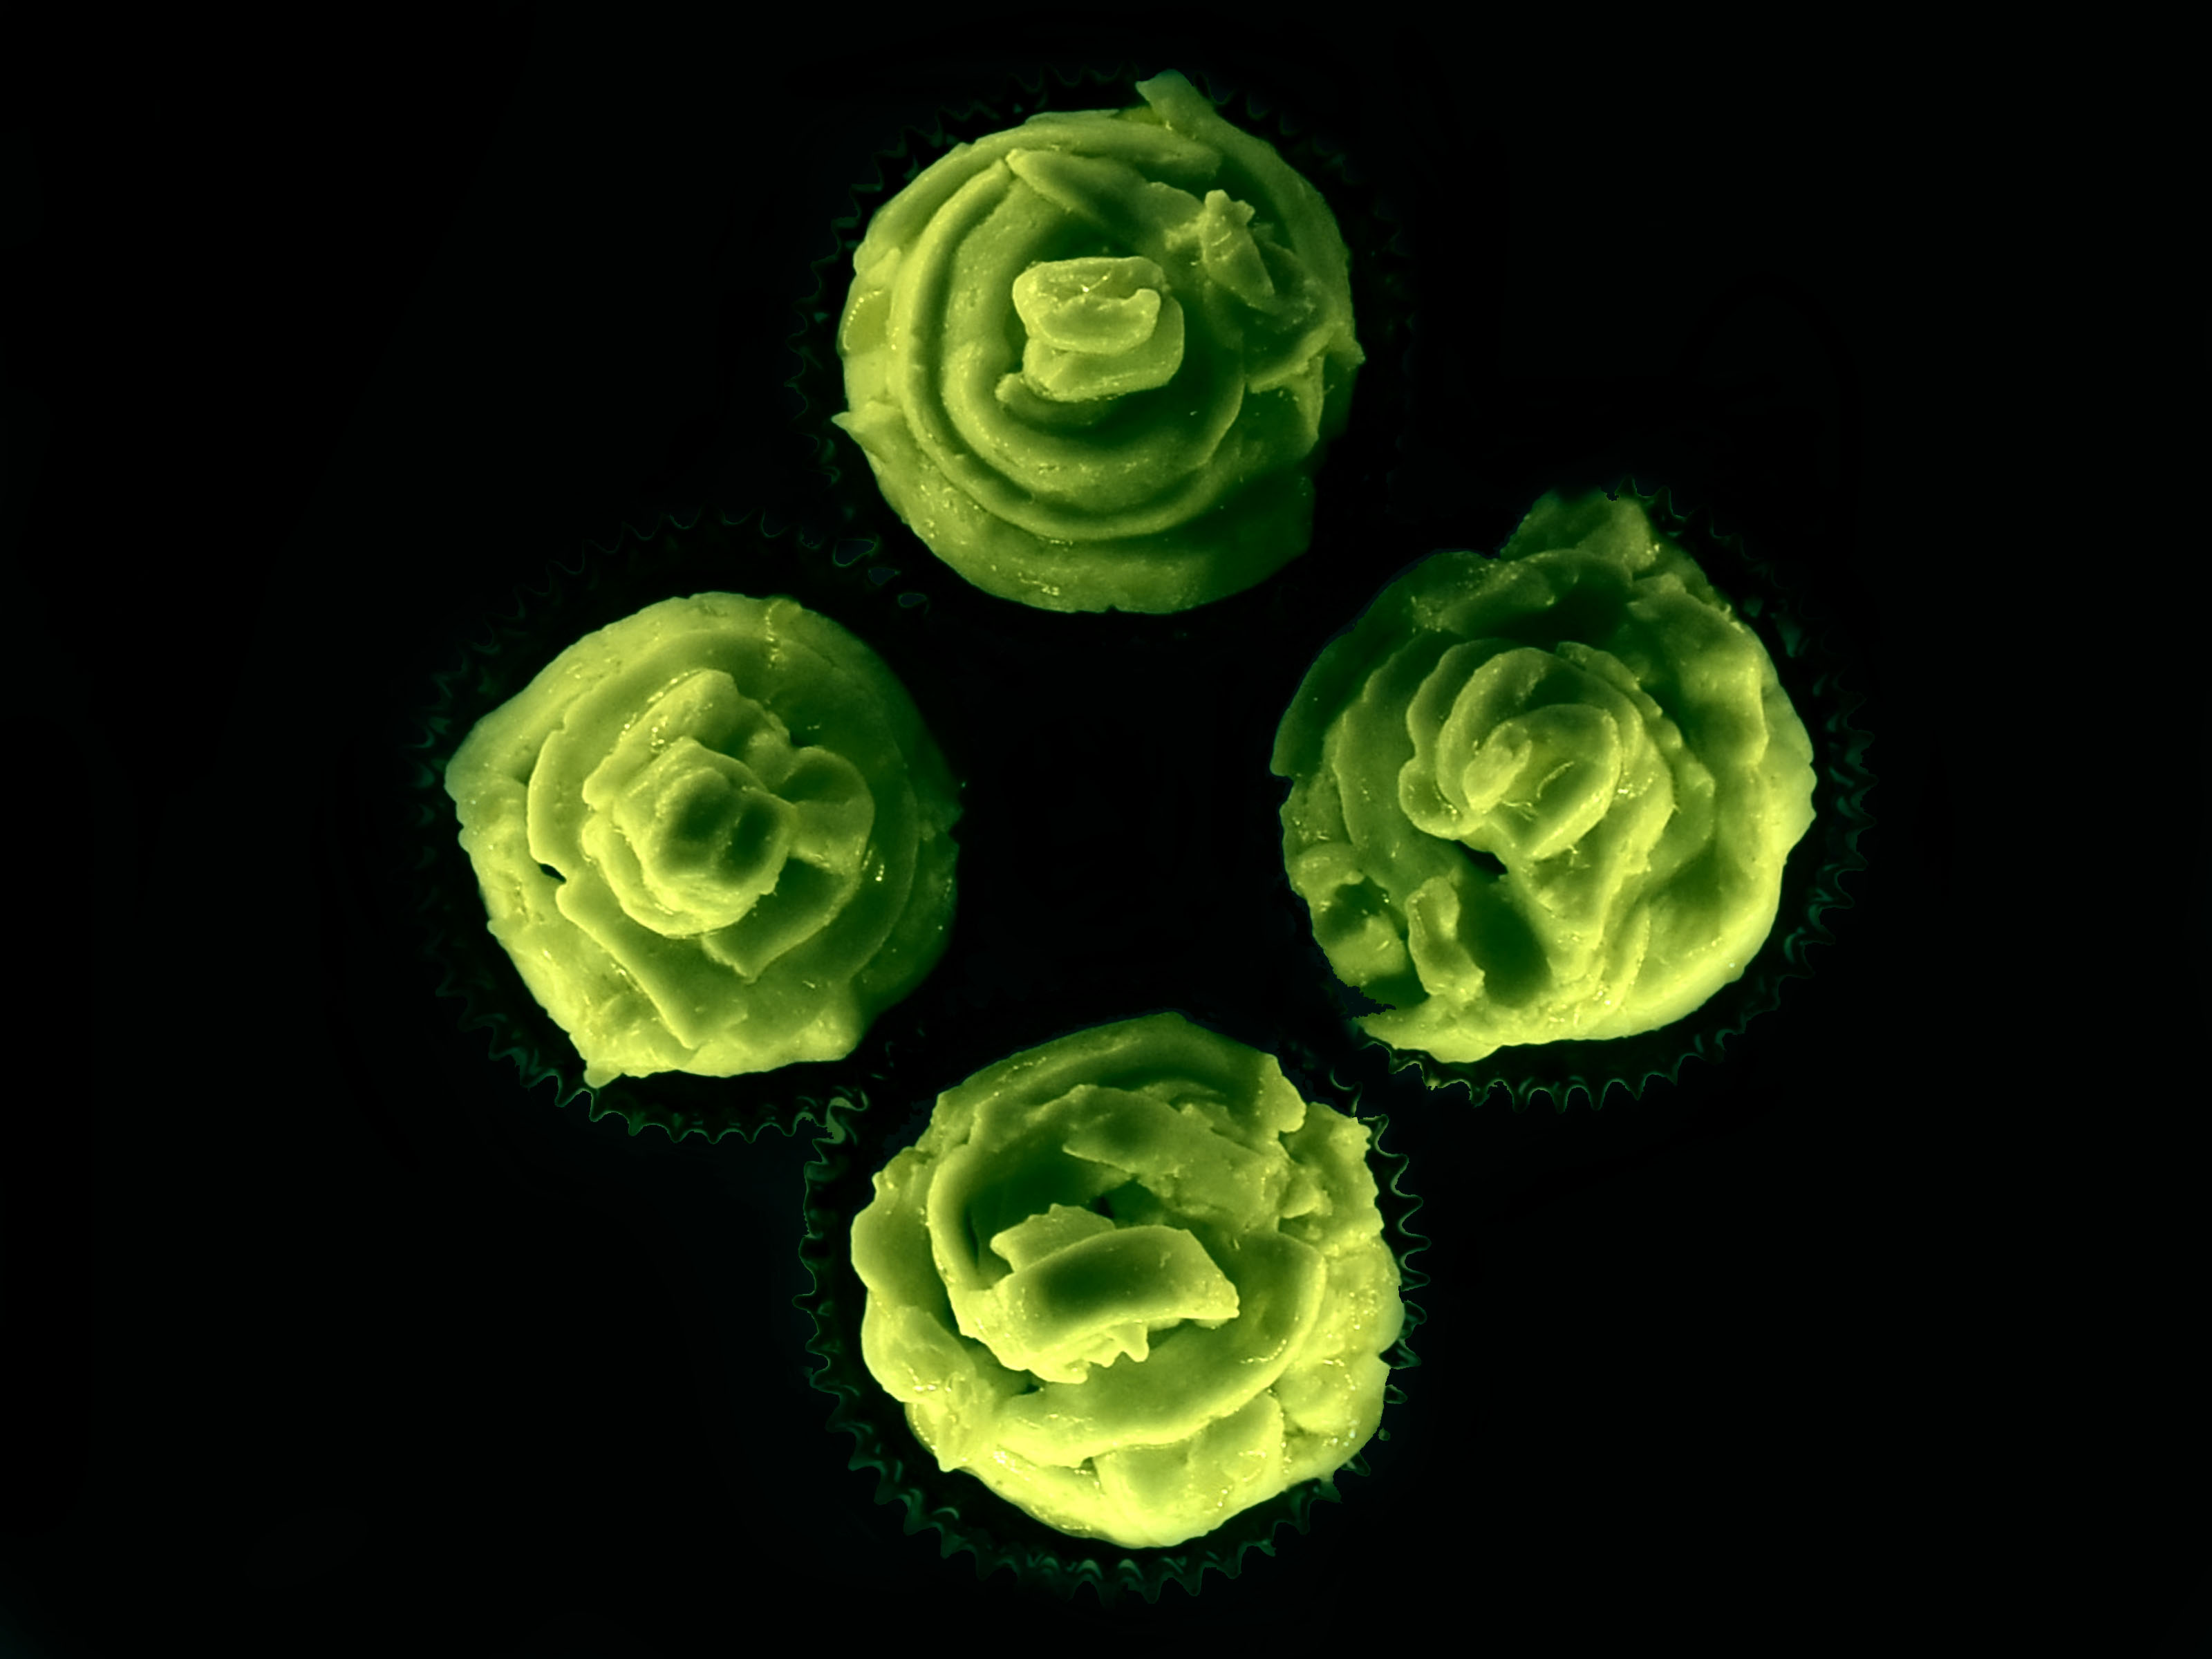
Divide the frosting into small bowls and tint each with neon gel food coloring. Gel colors are better than liquid colors because they create bold shades without watering down the frosting. Bright green, electric blue, hot pink, and lemon yellow usually look especially fun under black light.
For a party look, place two or three colors of frosting into one piping bag. When you pipe the frosting, the colors swirl together like a tiny edible galaxy. Add food-safe neon sprinkles if you want more texture and sparkle.
How to Make the Glow Glaze
Pour the tonic water into a small saucepan and sprinkle the gelatin over the top. Let it sit for 3 to 5 minutes so the gelatin can bloom. This helps prevent clumps. Warm the mixture over low heat, stirring until the gelatin dissolves. Do not boil it aggressively; a gentle warm-up is enough. Stir in sugar or light corn syrup to soften the bitterness of the tonic water.
Let the glaze cool until it is thickened but still brushable. If it becomes too firm, warm it gently for a few seconds. Brush a thin layer over the frosted cupcakes or drizzle it over the frosting peaks. Place the cupcakes under a black light to check the glow. Add another very thin layer if needed.
The glaze works best as a light coating rather than a heavy pour. Too much tonic water glaze can make frosting slippery or bitter. A thin layer gives you the glow without making the cupcake taste like it lost a fight with a soda fountain.
How to Get the Best Glow Effect
Use a Strong Black Light Setup
The glow depends heavily on the lighting. A weak black light across the room may not create much effect. Place a black light near the dessert table, angled toward the cupcakes, while keeping it away from direct eye level. Turn off bright overhead lights for the most dramatic result.
Choose Light-Colored Frosting Accents
White frosting, pale blue frosting, and neon yellow or green decorations often show up better than very dark colors. Dark purple frosting may look cool in daylight but can disappear under party lighting. If you want dark colors, use them as contrast rather than the main glowing surface.
Layer the Design
For the best visual impact, use three layers: a soft vanilla cupcake base, colorful neon frosting, and a thin tonic-water glaze. You can also add white chocolate stars, edible glitter labeled food-safe, or candy eyes for Halloween cupcakes. Just make sure every decoration is edible.
Test Before the Party
Before guests arrive, test one cupcake under the black light. This gives you time to adjust the glaze, lighting, or decorations. Testing is not just useful; it also gives you a completely valid excuse to eat a cupcake early. Quality control is a noble profession.
Flavor Variations for Glow in the Dark Cupcakes
Lemon Glow Cupcakes
Add 1 tablespoon of lemon zest to the cupcake batter and use lemon extract in the glaze. Lemon pairs nicely with the slightly bitter note of tonic water. Top with yellow frosting and white sprinkles for a bright, electric look.
Chocolate Galaxy Cupcakes
Use chocolate cupcakes as the base and pipe blue, purple, and pink buttercream on top. Add white star sprinkles and a thin glow glaze. The dark cupcake base makes the colorful frosting look like a mini galaxy.
Halloween Monster Cupcakes
Tint the frosting neon green and add edible candy eyes. Brush the glow glaze over the frosting and display the cupcakes under black light. They will look like friendly little monsters who are ready for snacks, not world domination.
Birthday Neon Party Cupcakes
Use rainbow frosting swirls, neon sprinkles, and cupcake toppers. This version is great for glow parties, skating parties, arcade birthdays, and any event where the dress code is “bright enough to confuse a moth.”
Common Mistakes to Avoid
Using Non-Edible Glow Products
This is the biggest mistake. Never open glow sticks or use craft glow powder on food. Those products are not made to be eaten. The glow should come from edible ingredients and lighting, not from shortcuts that belong in a craft bin.
Expecting Cupcakes to Glow Without Black Light
Tonic water fluoresces under UV light. Without a black light, your cupcakes may simply look like colorful cupcakes. Still delicious, yes. Supernatural, no.
Adding Too Much Tonic Water
Tonic water has a bitter flavor. A little can create a fun glowing effect, but too much can overpower the frosting. Use it in a thin glaze instead of dumping it into every part of the recipe.
Frosting Warm Cupcakes
If the cupcakes are even slightly warm, the frosting can slide, melt, or sag. Let them cool completely before decorating. Patience is not glamorous, but it saves frosting from becoming soup.
Overbaking the Cupcakes
Overbaked cupcakes lose moisture quickly. Start checking them at the lower end of the baking time. A toothpick should come out clean or with a few moist crumbs, not wet batter.
How to Store Glow in the Dark Cupcakes
If your cupcakes are frosted with basic American buttercream made from butter, powdered sugar, and a small amount of milk, they can usually sit at cool room temperature for a short party window. If the frosting contains cream cheese, whipped cream, custard, or lots of dairy, refrigerate the cupcakes and bring them out close to serving time.
Store decorated cupcakes in a covered container to prevent drying. If possible, add the tonic-water glaze the same day you plan to serve them. The glow effect looks best when the glaze is fresh and smooth.
Serving Ideas for a Glow Party
Place the cupcakes on a white or mirrored tray to reflect more light. Add neon paper decorations, food-safe glowing drink cups filled with tonic water, and black tablecloths for contrast. You can also create cupcake labels with names like “Moonbeam Vanilla,” “Alien Frosting Fuel,” “Midnight Lemon Glow,” or “Cosmic Confetti.”
For photos, turn off overhead lights and let the black light do the work. Take pictures from a slight angle so the frosting texture catches the glow. If the cupcakes look dull on camera, move the black light closer or add a white background behind the display.
Frequently Asked Questions
Are glow in the dark cupcakes safe to eat?
They can be safe when made with edible ingredients only. Use food-safe coloring, edible decorations, baked cupcakes, and a tonic-water glaze. Avoid craft products, glow sticks, and anything not labeled for food use.
Do glow in the dark cupcakes really glow?
They glow best under a black light because tonic water fluoresces under UV light. In regular darkness, they will not usually glow on their own.
Can I use store-bought cupcakes?
Yes. You can decorate store-bought cupcakes with neon frosting and tonic-water glaze. This is a great shortcut if you want the glowing effect without baking from scratch.
Can I make them without tonic water?
You can still make neon cupcakes with bright frosting and black light-friendly decorations, but the classic blue glow usually comes from tonic water. Without it, the effect may be more colorful than glowing.
Will the glaze change the flavor?
A thin glaze adds only a slight bitter note. Sugar, lemon, vanilla, or corn syrup can help balance it. Use a light hand for the best taste.
Extra Experience: What I Learned Making Glow in the Dark Cupcakes
The first thing you learn when making glow in the dark cupcakes is that the cupcake itself is only half the show. The other half is lighting. You can make the fluffiest cupcake in the world, pipe frosting like a champion, add sprinkles with the seriousness of a pastry chef on a cooking show, and still feel disappointed if the black light is weak or placed too far away. The glow effect is not shy, but it does need proper stage direction.
One of the best experiences is testing the cupcakes before guests see them. There is something ridiculously fun about turning off the kitchen lights, switching on the black light, and watching a tray of cupcakes suddenly look like they escaped from a neon arcade. The tonic-water glaze usually shows up as a cool blue glow, especially on pale frosting. Neon green and yellow frosting can look extra bold, while darker colors may become more mysterious than bright. That is not always bad. Sometimes mysterious cupcakes are exactly the vibe.
Another lesson is that flavor still matters. It is easy to get so excited about the glow that you forget people are actually going to eat these cupcakes. Tonic water has bitterness, so the glaze should be thin. A lemon cupcake works especially well because citrus makes the slightly bitter edge feel intentional. Vanilla is also a safe choice because it gives you a clean background for colorful frosting. Chocolate tastes great, but the dark base absorbs more light, so the glow has to come from the frosting and decorations.
Decorating is where the experience becomes pure fun. Swirling two or three frosting colors in one piping bag creates a dramatic neon effect without much effort. Even if the swirl is imperfect, it looks artistic. That is the beauty of glow party desserts: chaos can pass as design. Add star sprinkles, edible glitter labeled food-safe, or candy eyes, and suddenly each cupcake has its own personality. Some look elegant. Some look like tiny alien helmets. Both are acceptable.
The biggest practical tip is to keep the cupcakes chilled if your room is warm, especially after adding glaze. Buttercream can soften quickly under party lights. Bring the cupcakes out shortly before serving, arrange them under the black light, and let everyone enjoy the reveal. The “wow” moment is the whole reason to make them.
Glow in the dark cupcakes are not difficult, but they reward planning. Bake carefully, cool completely, decorate boldly, glaze lightly, and test the lighting early. Do that, and you get cupcakes that taste good, photograph well, and make people ask, “Wait, how did you do that?” That question is the baker’s version of applause.
Conclusion
Learning how to make glow in the dark cupcakes is really about combining good baking with smart presentation. Start with moist vanilla cupcakes, pipe bright neon buttercream, brush on a thin tonic-water glaze, and display everything under a black light. The result is safe, edible, colorful, and memorablebasically everything a party dessert should be, minus the need for a wizard license.
The most important rule is simple: keep it food-safe. Use edible ingredients only, avoid craft glow products, and handle batter properly. Once safety is covered, you can have fun with colors, themes, sprinkles, party trays, and dramatic lighting. These cupcakes are perfect for Halloween, birthdays, glow parties, movie nights, and any event that needs dessert with a little extra personality.
