
New Arrivals
Ikea Hack: How to Build a Toddler Learning Tower Kitchen Stool
Jun
There comes a day in every parent’s kitchen when a tiny person with yogurt on their shirt looks up and says, “I help.” This is adorable. It is also the moment your peaceful cooking routine turns into a live-action obstacle course involving raw flour, slippery socks, and a toddler who believes gravity is merely a suggestion.
That is where a toddler learning tower kitchen stool comes in. Also called a kitchen helper stool, Montessori learning tower, or toddler standing tower, it gives little ones a raised, enclosed place to stand while washing fruit, stirring pancake batter, sprinkling cheese, or supervising you with the confidence of a tiny restaurant critic. A ready-made tower can be expensive, but a smart Ikea hack can create a practical version for much less.
This guide walks through how to build an Ikea learning tower using a sturdy step stool as the base and simple lumber rails as the guard structure. The design is inspired by popular BEKVÄM-style learning tower projects, but with an extra focus on stability, supervision, and common-sense safety. Cute is nice. Cute plus “not wobbling like a shopping cart with one cursed wheel” is better.
What Is a Toddler Learning Tower?
A toddler learning tower is a raised standing platform with side rails that helps a child reach counter height while staying more contained than they would on a regular chair. The goal is not to turn your toddler into a sous-chef overnight. The goal is to let them participate safely in real family routines: rinsing berries, tearing lettuce, pouring pre-measured ingredients, wiping the counter, or watching how dinner becomes dinner.
The Montessori idea behind a learning tower is simple: children learn by doing. When a child can see the counter, they can imitate, practice motor skills, build confidence, and feel included. The kitchen becomes a classroom where the lesson plan is “please do not lick the measuring spoon after it touched raw egg.”
Why Use an Ikea Hack?
The main reason parents love this Ikea hack is value. A premium toddler tower can cost well over $100, and some designer versions cost as much as a small vacation if your vacation includes one night in a motel and a vending-machine dinner. By using an Ikea step stool and basic boards from a home improvement store, you can make a custom toddler kitchen stool that looks good, fits your space, and can be painted or sealed to match your kitchen.
The Ikea BEKVÄM step stool is a popular base because it is made from solid wood, has two steps, includes a hand-hole for easy moving, and is designed for everyday home use. It also has a compact footprint, which matters if your kitchen already feels like a game of appliance Tetris. However, once you modify any product, you become responsible for the safety of the finished project. That means using strong fasteners, sanding thoroughly, checking for tipping, and never treating the tower as a babysitter with legs.
Before You Build: Safety First, Pinterest Second
Toddler towers are useful, but they deserve respect. Recent U.S. product recalls have involved children’s tower stools that could collapse, tip, or create entrapment hazards. That does not mean every learning tower is dangerous. It does mean your DIY version should be built conservatively, inspected often, and used only with close adult supervision.
Important Safety Rules
- Use the learning tower only when an adult is within arm’s reach.
- Place it on a flat, dry floor away from stairs, rugs, cords, pets, and swinging cabinet doors.
- Keep the tower away from hot burners, oven doors, knives, glass, blenders, and hot liquids.
- Teach your child to climb in and out slowly, facing the tower.
- Do not let children jump, rock, lean over the rails, or use the tower as playground equipment.
- Check screws, rails, and joints regularly. If anything loosens, stop using it until repaired.
- Add anti-slip strips to standing surfaces, especially if you paint or seal the wood.
A good rule: if you would not want your toddler doing it on a regular step stool, do not let them do it in a learning tower. The rails help, but they do not cancel toddler physics.
Materials You Will Need
This project can be completed with basic tools. You do not need a professional workshop, a table saw the size of a canoe, or a flannel shirt that says “I own seven clamps.” You do need accurate cuts, strong screws, and patience.
- 1 Ikea BEKVÄM step stool or similar solid wooden step stool
- One 6-foot 1×2 board for vertical supports and rail pieces
- One 6-foot 1×3 board for side and back rails
- Wood screws, usually 1 1/2-inch and 2 1/4-inch sizes depending on board thickness
- Wood glue rated for interior wood projects
- Wood filler
- Sandpaper or sanding block, medium and fine grit
- Drill and drill bits
- Countersink bit, optional but helpful
- Saw, or have the boards cut at the store
- Measuring tape, pencil, and square
- Non-toxic paint, stain, or clear sealer
- Anti-slip strips or non-slip tread tape
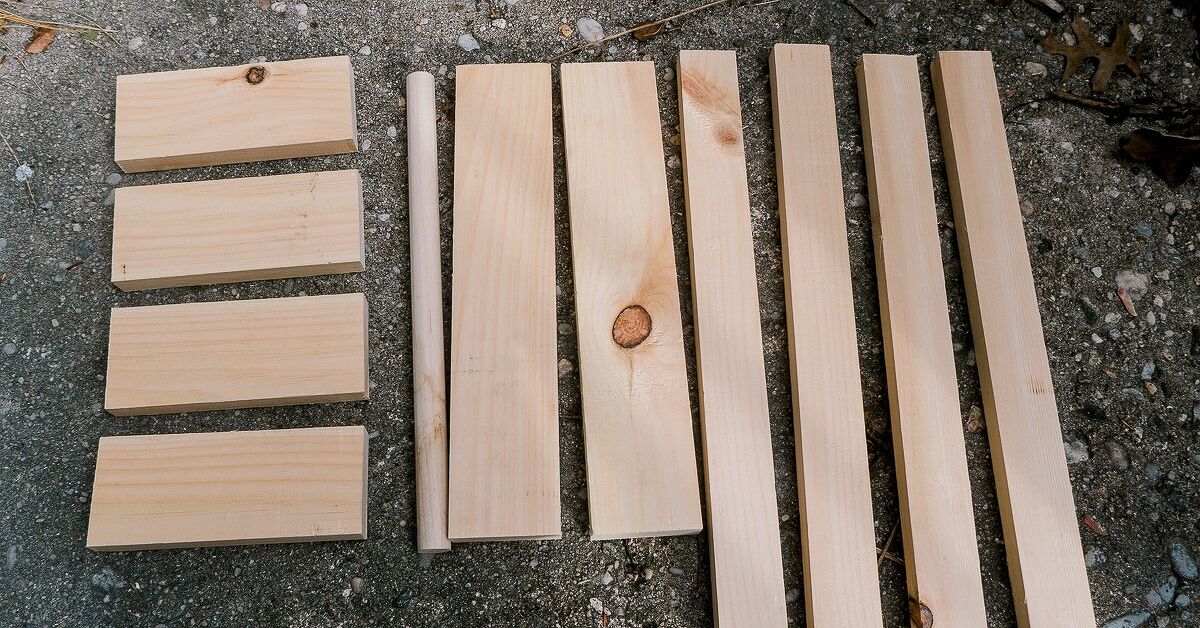
Suggested Cut List
Measure your actual stool before cutting because Ikea products and board dimensions can vary slightly. The following cut list works for many BEKVÄM-style toddler learning tower builds, but the safest DIY habit is to measure twice, cut once, and then measure again because toddlers are expensive enough without wasting lumber.
- Four vertical posts: about 15 1/2 inches long from 1×2 lumber
- Two side top rails: about 12 1/2 to 12 3/4 inches long from 1×3 lumber
- Two front or side lower rails: about 6 to 6 1/2 inches long from 1×3 lumber
- One back rail or removable entry rail: about 12 1/2 to 12 3/4 inches long
- Optional round dowel for the rear safety bar: about 12 1/2 inches long
The exact placement depends on your child’s height and how you want them to enter the tower. Many parents leave one side partially open for climbing and use a back rail high enough to discourage leaning backward. If your child is a determined escape artist, consider a fixed back rail and help them climb in every time.
Step-by-Step: How to Build the Ikea Toddler Learning Tower
Step 1: Assemble the Ikea Step Stool
Build the step stool according to the manufacturer’s instructions. Tighten the screws firmly, but do not strip them. The base must be square and stable before you add anything. Place the stool on a flat floor and press down on each corner. If it rocks, fix that before moving on. A learning tower should not begin life with the personality of a wobbly café table.
Step 2: Sand All Lumber
Sand every board before assembly, including edges and corners. Toddlers touch everything. They will grip the rails, drag fingers along the sides, and somehow find the one splinter you missed with the precision of a tiny wood-detecting machine. Round over sharp edges lightly so the tower feels smooth but still solid.
Step 3: Build the Upper Rail Frame
Lay out the four vertical posts. Attach side rails between the posts to create two rectangular side frames. Use wood glue at each joint, drill pilot holes, and drive screws through the posts into the rails. Pilot holes reduce splitting and make the finished tower stronger. Keep everything square while fastening. A carpenter’s square helps; so does not rushing while your toddler yells “snack” in the background.
Step 4: Add the Back Rail
Connect the two side frames with a back rail. This rail helps prevent the child from stepping backward off the platform. Some DIY versions use a dowel; others use a flat board. A flat board can feel more secure, while a dowel may be easier for small hands to grab. Avoid large gaps that could allow a child’s head, torso, or limbs to become trapped.
Step 5: Attach the Rail Structure to the Stool
Set the upper frame on the top platform of the step stool. Center it carefully and check that it does not overhang in a way that makes the tower easier to tip. Clamp if possible. Drill pilot holes down through the vertical posts or lower rail points into the stool top. Fasten with screws long enough to hold securely but not so long that sharp points poke through where little hands or legs can reach.
Step 6: Reinforce the Joints
After the frame is attached, gently push the rails forward, backward, and side to side. If you feel movement, add corner blocks, extra screws, or additional side braces. The tower should feel like one unit, not like a stool wearing a loose wooden backpack. Reinforcement is especially important because toddlers rarely stand still. They bounce, wiggle, lean, and occasionally dance because someone said the word “banana.”
Step 7: Fill, Sand, and Finish
Fill screw holes with wood filler if you want a cleaner look. Once dry, sand again. Apply a child-safe, low-VOC paint, stain, or clear finish according to the product instructions. Keep in mind that glossy paint can make steps slippery, so add anti-slip strips after the finish cures. If you prefer a natural look, a clear sealer keeps the wood easier to wipe down after the Great Applesauce Incident of Tuesday Morning.
Step 8: Add Anti-Slip Protection
Apply non-slip tread tape to the standing platform and lower step. This is one of the simplest upgrades and one of the most useful. Kitchens are full of water drops, fruit juice, and mysterious sticky patches no one wants to investigate. Anti-slip strips add grip and make the tower feel more secure under small feet.
Step 9: Perform a Stability Test
Before your child uses the tower, test it yourself. Push gently from different directions. Press on the rails. Check whether the tower tips too easily when weight is applied near the edges. Tighten all screws. If it feels unstable, widen the base with anti-tip feet or choose a different design. Never use a tower that tips easily, even if it looks adorable in sage green.
How to Use the Learning Tower in the Kitchen
Once the tower is built, start with calm activities. Let your toddler wash apples in a bowl, stir dry ingredients, tear lettuce, transfer pasta with a spoon, sprinkle herbs, or wipe the counter with a damp cloth. Keep sharp tools and hot items far away. Use the back burners when cooking, turn pot handles inward, and create a clear three-foot hot zone around the stove unless your child is helping with a specific supervised task far from heat.
Food safety can become part of the routine. Teach “wash hands first,” “clean the counter,” “separate raw meat,” and “do not taste until a grown-up says it is safe.” Toddlers love rituals. If the ritual includes soap, a tiny towel, and a dramatic chef voice, even better.
Best Toddler Activities for a Kitchen Helper Stool
For Young Toddlers
Try rinsing produce, moving crackers from one bowl to another, wiping spills, placing napkins on the table, or stirring room-temperature ingredients. Keep sessions short. Five minutes of happy participation beats twenty minutes of chaos and one avocado on the floor.
For Older Toddlers
Older toddlers can help pour pre-measured ingredients, mash bananas, use a child-safe spreader, sprinkle shredded cheese, arrange toppings, or press cookie cutters into dough. The tower gives them access, but you still control the task, tools, and environment.
For Non-Kitchen Uses
A learning tower can also help at the bathroom sink for handwashing or toothbrushing, as long as the floor is dry and an adult is present. It can be useful near a craft table too, but avoid paint jars, scissors, beads, or anything that turns into either a choking hazard or modern art on your wall.
Common Mistakes to Avoid
- Skipping pilot holes: This can split the wood and weaken the frame.
- Using short screws: Rails need a firm bite into the wood.
- Leaving big rail gaps: Large openings can create fall or entrapment risks.
- Painting without grip strips: A pretty finish can become slippery.
- Letting two children climb in together: Most DIY towers are designed for one child at a time.
- Using it near heat: A learning tower belongs near prep space, not beside boiling pasta.
- Forgetting maintenance: Wood moves, screws loosen, and toddlers test engineering like unpaid product inspectors.
Is an Ikea Learning Tower Worth It?
For many families, yes. A DIY toddler learning tower can make daily routines easier and more meaningful. Instead of holding your child on one hip while cracking eggs with the other hand, you can give them a defined place to stand and a simple job to do. It encourages independence, practical life skills, and family connection.
Still, this project is not for everyone. If you are uncomfortable modifying furniture, do not have the right tools, or cannot confidently test stability, a commercially made learning tower with strong safety documentation may be a better choice. If your child is especially impulsive, climbs aggressively, or cannot follow simple instructions yet, wait. The best learning tower is the one your child is ready to use safely.
Real-Life Experience: What It Is Actually Like to Use One
The first thing you learn after building an Ikea toddler learning tower is that your child will use it immediately, proudly, and not always for the task you imagined. You pictured sweet banana bread moments. Your toddler pictured becoming eye-level with the fruit bowl and conducting quality control by poking every peach. This is normal. The tower changes their view of the kitchen, and suddenly the counter is not a mysterious adult planet. It is a reachable world full of bowls, bubbles, crumbs, and opportunity.
In daily use, the best moments are surprisingly small. A toddler standing in the tower can rinse strawberries and feel like they made breakfast. They can dump a cup of oats into a bowl and beam as if they personally invented oatmeal. They can help spread peanut butter, arrange cucumber slices, or stir muffin batter with the intense focus of a scientist handling moon rocks. These jobs may slow you down, but they often reduce whining because the child is included instead of parked on the floor wondering why the grown-ups are doing secret counter activities.
The messy part is real. Flour will miss the bowl. Water will splash. A small child will wipe the counter with great seriousness and somehow make it wetter than before. The trick is to choose jobs where mess is acceptable. Put a towel under the tower. Use large bowls. Pre-measure ingredients. Offer one task at a time. If you hand a toddler a whisk, a cup of milk, and complete freedom, congratulations: you have invented kitchen weather.
The tower also teaches boundaries. In our imaginary-but-very-realistic kitchen scenario, the rule is simple: “Feet stay on the step. Hands stay on your job.” When the child leans, climbs, or reaches toward unsafe items, the tower session ends. Not angrily, not dramatically, just consistently. Toddlers understand routines faster than lectures. A calm rule repeated every time works better than a ten-minute safety speech delivered to someone wearing one sock.
One underrated benefit is confidence. Children like to contribute. When they help wash vegetables or carry napkins to the table, they are not just “staying busy.” They are learning that family life includes them. The learning tower becomes a bridge between dependence and participation. It says, “You are small, but you can help.” That is powerful.
Maintenance becomes part of the experience too. Every few weeks, check the screws. Look for cracks, wobble, peeling finish, or worn anti-slip strips. Wipe the wood after messy activities and keep the tower dry. A DIY learning tower is not a build-it-and-forget-it project. It is more like a tiny piece of kitchen equipment that requires regular inspection, especially because its main user thinks stepping in place is a sport.
Overall, the Ikea hack learning tower is worth building when you value shared kitchen time, have the skills to assemble it safely, and accept that “helping” sometimes means dinner takes twelve minutes longer. The reward is a toddler who feels involved, a kitchen that becomes more interactive, and a parent who can finally stop saying, “Please don’t climb the chair,” every nine seconds.
Conclusion
An Ikea hack toddler learning tower kitchen stool is one of those DIY projects that blends function, savings, and family life beautifully. With a solid step stool, carefully attached rails, smooth edges, anti-slip treads, and smart supervision, you can create a kitchen helper stool that invites your child into everyday routines. The project is beginner-friendly, but it should never be treated casually. Stability, rail spacing, screw strength, and safe placement matter more than paint color.
Build it carefully, test it honestly, and use it thoughtfully. Then enjoy the tiny assistant who will stir the batter, wash the blueberries, and remind you that cooking with kids is equal parts learning, laughter, and wiping something sticky off the cabinet.
