
New Arrivals
World’s Cheapest ARM Debugger Is Actually RISC-V
Jun
In embedded development, every workbench eventually develops a small ecosystem of tiny boards, mystery cables, half-labeled adapters, and at least one USB dongle that nobody dares unplug because it “might be important.” Into this glorious mess comes a wonderfully odd idea: what if one of the cheapest RISC-V microcontrollers on the market could become a debugger for Arm chips?
That is the delightful twist behind the project commonly described as the world’s cheapest ARM debugger. Instead of using a pricey commercial debug probe, a Raspberry Pi Pico, or a vendor-specific tool, the project uses the ultra-low-cost CH32V003 RISC-V microcontroller to speak the language of Arm debugging through CMSIS-DAP and SWD. In plain English: a tiny RISC-V chip pretends to be the tool your Arm microcontroller expects. It is a bit like hiring a budget scooter to tow a sports car, then discovering it actually gets the job done.
What Is an ARM Debugger?
An Arm debugger is a hardware interface that lets developers program, inspect, pause, step through, and troubleshoot firmware running on Arm-based microcontrollers. When code refuses to behave, a debugger is the calm adult in the room. It can halt the processor, read registers, inspect memory, set breakpoints, and help answer the classic embedded question: “Why is this LED not blinking when I very specifically asked it to blink?”
Most modern Arm Cortex microcontrollers expose debug access through Serial Wire Debug, usually shortened to SWD. SWD uses only a couple of signal lines, commonly SWDIO and SWCLK, plus ground and sometimes reset. Compared with older JTAG setups, it is compact, convenient, and friendly to small boards where every pin is precious.
The Funny Part: The Debugger Is RISC-V
The headline sounds like a prank, but the idea is technically sensible. A debug probe does not need to be an Arm chip. It needs to speak the right protocol to the host computer over USB and the right protocol to the target device over SWD or JTAG. If the firmware can translate between those worlds, the processor architecture inside the probe becomes less important.
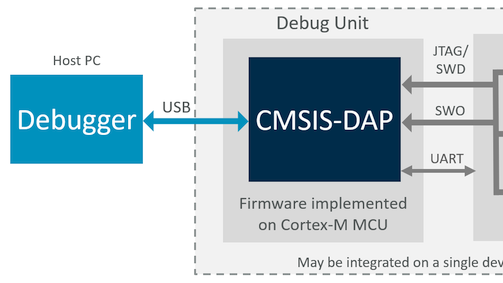
That is where CMSIS-DAP enters the story. CMSIS-DAP is a standardized debug probe protocol used by development tools to communicate with Arm CoreSight debug hardware. A probe running CMSIS-DAP firmware can appear to tools such as pyOCD and OpenOCD as a compatible debug interface. The host sends commands over USB; the probe wiggles SWD pins; the target responds; and everyone pretends this was simple.
In this project, the probe’s brain is not an Arm microcontroller at all. It is the WCH CH32V003, a tiny RISC-V MCU known for its absurdly low price, 48 MHz operating speed, 16 KB of flash, 2 KB of SRAM, and enough peripherals to make hobbyists start ordering PCBs at midnight. It is not luxurious. It is not spacious. But it is cheap, fast enough for the job, and extremely entertaining.
Why the CH32V003 Matters
The CH32V003 became famous because it pushed the cost of a 32-bit microcontroller into “did I read that correctly?” territory. In bulk, the chip has been discussed around the ten-cent class, which makes it cheaper than many connectors, buttons, and possibly the snack you ate while reading the datasheet.
Despite the tiny price, the chip includes a QingKe RISC-V core, general-purpose I/O, timers, communication interfaces such as UART, SPI, and I2C, ADC capability, and a small but workable memory budget. That memory budget is the catch. Building a debugger on a chip with 2 KB of SRAM is not exactly a spa day. Firmware must be lean, careful, and disciplined. There is not much room for “just one more abstraction layer,” which is good news for people who enjoy C and bad news for people who bring an entire software cathedral to toggle one pin.
How a RISC-V Chip Can Debug an Arm Chip
1. USB Talks to the Computer
The host computer sees a CMSIS-DAP-compatible device. Tools such as pyOCD or OpenOCD can list the probe, open a session, and send debug commands. In conventional probes, this USB-facing job may be handled by an Arm MCU, an RP2040, an STM32, or a dedicated interface chip. Here, the CH32V003 takes on the role using a software USB approach.
2. CMSIS-DAP Translates Debug Commands
CMSIS-DAP acts as the common language between development software and debug hardware. Instead of every IDE needing to know the weird personal habits of every debug probe, CMSIS-DAP provides a standardized command set. This is why compatible probes can work across multiple tools and operating systems, at least when drivers, USB libraries, and the firmware gods are feeling generous.
3. SWD Talks to the Target Microcontroller
On the target side, the debugger uses SWD. The probe drives clock and data signals, sends the required sequences, reads responses, and lets the host inspect or control the Arm target. The CH32V003 is simply the messenger. It does not need to be Arm to talk to Arm; it just needs to move bits at the right time, in the right order, without getting stage fright.
The Main Engineering Challenge
The project is clever because it squeezes useful debugger behavior out of a microcontroller that was never meant to be a premium debug probe. One limitation is USB speed and endpoint support. The CH32V003 can support low-speed USB through software, which affects the kind of USB transfers and performance expectations available to the design.
That means this is not a J-Link replacement for professional high-speed trace, production flashing, or large firmware workflows. It is a minimal, charming, surprisingly capable debugger. Think of it as the embedded equivalent of a tiny hatchback that cannot tow a boat but can absolutely get you to the grocery store while using three drops of fuel.
The firmware also had to implement the right CMSIS-DAP hooks and SWD pin operations. A tiny mistake in how one output bit is handled can break communication completely. That is common in embedded work: the bug spends two days wearing a fake mustache, then turns out to be a single missing mask operation. Microcontrollers have a talent for comedy, but only after the debugging session is over.
Why Makers Love Projects Like This
The appeal is not only price. Yes, a nearly disposable debugger is useful. But the deeper attraction is educational. When you build a debug probe from a tiny chip, you learn what commercial tools usually hide. You see how USB descriptors matter, how CMSIS-DAP is structured, how SWD transactions are sequenced, and why timing can turn a beautiful schematic into a silent brick.
This is the kind of project that teaches embedded development from the floorboards upward. Instead of clicking “debug” and hoping the IDE has packed a lunch, you begin to understand the path from computer to probe to target silicon. That knowledge is powerful. It makes you better at diagnosing custom boards, weird clones, flaky cables, and the suspiciously warm component near the USB port.
How It Compares With Other Debug Probes
Raspberry Pi Debug Probe
The Raspberry Pi Debug Probe is inexpensive, friendly, open source, and compatible with CMSIS-DAP. It offers USB-to-SWD and USB-to-UART features, making it excellent for Raspberry Pi Pico and many other Arm-based targets. It is far more polished than a bare CH32V003 project and includes nice cables, documentation, and fewer opportunities to question your life choices.
ST-LINK
ST-LINK tools are common in the STM32 world. They are reliable for STM8 and STM32 workflows and often appear built into development boards. For engineers working mostly with STMicroelectronics devices, ST-LINK is practical and familiar. The downside is that vendor tools can feel less universal than CMSIS-DAP or J-Link-style options, depending on the target and software stack.
SEGGER J-Link
SEGGER J-Link probes are professional-grade tools with broad CPU support, high performance, mature software, and features that matter in commercial development. They support Arm, RISC-V, and many other targets. They are not competing with a ten-cent-class experiment on price; they compete on reliability, speed, support, and productivity. In a professional lab, that matters.
The CH32V003 CMSIS-DAP Route
The CH32V003-based debugger is best understood as a brilliant low-cost hack, a learning platform, and a proof that useful debug hardware can be made from shockingly modest parts. It is not the fastest horse in the barn. It may not even be a horse. It might be a determined goat with a USB connector. But for learning and lightweight use, that goat has spirit.
Real-World Use Cases
A cheap RISC-V-based Arm debugger makes sense for classrooms, workshops, electronics clubs, and makerspaces. If students need to learn SWD debugging, a very low-cost probe reduces the fear of breaking something expensive. If a hobbyist wants to scatter debug interfaces across multiple projects, the economics become appealing. If an engineer simply wants to understand CMSIS-DAP more deeply, this project is a hands-on textbook with solder pads.
It can also be useful for recovery and field kits. Imagine keeping several tiny probes in a drawer, toolbox, or travel bag. When a board stops responding, you do not have to hunt for the one premium probe that somebody borrowed “for five minutes” last Tuesday. You grab a cheap adapter, connect SWDIO, SWCLK, ground, and power reference, and begin the ritual.
Limitations You Should Know Before Building One
The biggest limitation is performance. Low-speed USB and a tiny MCU are not ideal for heavy-duty debugging. Flash programming may be slower than commercial probes. Compatibility may vary between operating systems, USB stacks, and tool versions. Some setups may work beautifully on one machine and then become moody on another, because embedded tools enjoy character development.
Electrical considerations also matter. A debug probe must share a proper ground reference with the target. Voltage levels must be compatible. Long wires can introduce signal integrity problems. A bargain debugger is still connected to real hardware, and real hardware does not care how funny the blog post was when you short 5 V into the wrong pin.
What This Project Says About RISC-V
The project highlights one of the most exciting things about RISC-V: it is showing up everywhere, including in places where users may not even notice it. A RISC-V microcontroller does not have to be the star of the final product. It can be the helper chip, the bridge, the controller, the adapter, or the invisible assistant doing the boring work so the main system can shine.
That matters because low-cost RISC-V chips are changing the economics of experimentation. When microcontrollers become cheap enough to treat as glue logic with a brain, engineers can solve problems differently. Instead of asking, “Can I justify a microcontroller here?” the question becomes, “Why not use one if it saves time and simplifies the design?”
Experience Notes: Building and Using a Tiny RISC-V ARM Debugger
Working with a project like this feels different from using a polished commercial probe. With a professional debugger, you plug it in, select a target, and expect the software to behave. With a tiny RISC-V CMSIS-DAP probe, the experience is more personal. You are closer to the machinery. You notice the USB enumeration. You care about descriptors. You watch whether pyOCD sees the probe. You learn that “device detected” is not the finish line; it is merely the part where the project smiles and says, “Now solve the next puzzle.”
The first lesson is that wiring matters more than confidence. SWD is simple, but simple does not mean magical. SWDIO must go to SWDIO, SWCLK must go to SWCLK, ground must be common, and target voltage must be understood before anything meaningful happens. Many beginners suspect firmware first, but the culprit is often a swapped wire, a missing ground, or a target board that is not powered the way they think it is. The cheapest debugger in the world cannot overcome a breadboard jumper placed with heroic optimism and zero verification.
The second lesson is that open tools are wonderful but occasionally dramatic. OpenOCD and pyOCD are powerful because they support many probes and targets, but that flexibility also means configuration matters. A working command line can feel like a magic spell: interface file, target file, adapter speed, reset behavior, flash command, and just enough punctuation to make the terminal happy. Once the setup works, save it immediately. Future you will not remember the exact incantation, and future you is already busy blaming the cable.
The third lesson is patience. Tiny embedded systems rarely fail with helpful pop-up messages. They fail by doing nothing. No LED. No log. No cheerful “almost there.” A logic analyzer becomes a best friend because it shows whether signals are moving at all. If SWCLK is silent, the issue is probably on the probe or host side. If SWDIO responds strangely, timing or direction control may be wrong. If everything looks alive but the tool refuses to connect, then the problem may be protocol, reset sequencing, or target configuration. Debugging a debugger is delightfully recursive, like trying to fix your glasses while wearing them.
The final lesson is that cheap tools can be serious learning tools. A CH32V003-based debugger may never replace a J-Link on a professional production line, and that is fine. Its value is not only measured in speed. It teaches how CMSIS-DAP works, how SWD behaves, how USB devices identify themselves, and how much can be done with very little silicon. For makers, students, and curious engineers, that is the real treasure. The low price is just the punchline.
Conclusion
The world’s cheapest ARM debugger being powered by RISC-V is more than a clever headline. It is a reminder that embedded development is full of strange, elegant crossovers. A tiny CH32V003 can become a CMSIS-DAP probe. A RISC-V chip can help debug an Arm microcontroller. A few cents of silicon can teach lessons that expensive tools politely hide.
For professional production work, buy the dependable probe and enjoy your stable workflow. For learning, experimenting, and appreciating the delightful weirdness of modern microcontrollers, this project is a gem. It proves that the embedded world still has room for playful engineering, tiny budgets, and the occasional debugger that looks at architecture boundaries and says, “That’s cute.”
